THIS POST MAY CONTAIN AFFILIATE LINKS. PLEASE SEE THE DISCLOSURE POLICIES FOR DETAILS.
Are you thinking about learning to weave? Do it! Just give it a try.
Weaving on a loom is easier than you might think. You will need a few tools and materials and someone to show you how to weave (me!). Follow along and you will have made your first DIY woven wall hanging in no time!
This article is part of a four-part DIY weaving tutorial series. Follow along and learn how to make your own woven wall hanging!
1. In this first article we’ll go through the tools you will need to make your first weave and how to properly set up your weaving loom. This is a good place to start if you are a beginner weaver or just need a quick refresher.
2. Start your wall hanging with a few basic weaving techniques. I start every weave with a few rows of a plain weave. And I love a good fringe, so there will be some rya knots. And a few rows of the classic basket weave.
3. Moving on to some more weaving techniques that add even more texture and depth to your wall hanging. The loopy pile weave, soumak braids, and weaving with wool roving.
4. The last part of the series shows how to finish your wall hanging and get it off your loom and up on your wall!
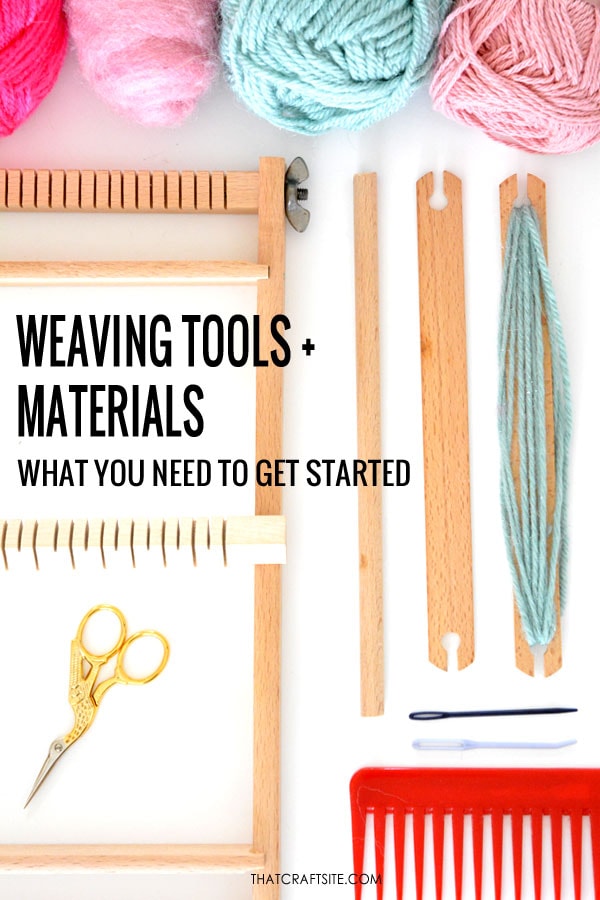
Weaving Tools and Materials
Let’s talk terminology for a bit. Weaving loom, heddle bar, stick shuttles, there are a few terms that might be unfamiliar if you are a beginner weaver. But no worries, let me tell you what everything is so you can get you started.
weaving loom
The loom is your most important piece of equipment. It’s the frame that you use to make your weave on. Once your weave is finished, you will remove it from the loom.
Looms come in different sizes. There are smaller, lap looms, and larger, standing looms. You can even find round looms!
The top and bottom bars of your weaving loom have notches or pegs to warp the loom. On some looms, these can be turned to adjust the overall tension of the warp.
Heddle bar or shed stick
These are optional, but both are big time savers.
The heddle bar is the middle bar on your loom. Rotating the heddle bar creates an opening between alternating vertical warp threads in either direction. This makes it easier and much faster to weave your horizontal weft threads through your warp.
If you have no heddle bar, you could also use a shed stick. A shed stick is a piece of flat wood or plastic that you flip and turn on its side to create the opening, or shed. Lay the shed stick flat to close the shed.
The heddle bar creates a shed for your weaving to go through both ways, a shed stick just creates a shed going one way. Using a shed stick, you will have to weave your shuttle or needle through up and down the threads going back each alternate row.
You don’t need anything fancy or special. Any ruler you have around will work fine as a shed stick. Just make sure it’s as long as your project is wide.
The warp
The warp are the vertical threads on your weaving loom. These threads give structure to your weave, so you want them to be strong. You can use linen, or my favorite, cotton yarns. Setting up the loom is also sometimes called dressing the loom.
The weft
The weft are the threads going horizontally across the loom. The yarns that you weave over and under the warp threads to create your design.
The shed
The shed is the tent-shaped space between the warp threads that you create by using a shed stick or a heddle bar. This opening makes it easier to pass the shuttle or needle with your weft threads through the warp.
Tapestry beater or loom comb
You want some type of tapestry beater or loom comb to push your horizontal weft threads down when you weave.
This can be a special tapestry beater or something like an afro pick or a plastic comb. I’ve even seen people use regular kitchen forks as a loom comb. I like to use a wide-tooth vintage pocket comb. These won’t break as quickly as newer-made combs.
Weaving shuttles or stick shuttles
A weaving shuttle literally shuttles your weft yarn back and forth through your warp. Shuttles are optional to use, but again, an option that will make you weave quicker.
Wrap your yarn around the shuttle and guide the shuttle through the shed.
Use a shuttle that is a little wider than your weave. This makes it easy to unwind and work with just the right amount of yarn for each row.
Tapestry Darning needle
A long needle is great for doing detailed work on your weave and finishing off the back side when you’re done.
You can use any needle with a large enough eye to fit your yarns. If you have one of those plastic kids’ needles with a large eye and blunt tip, you could even use that.
My favorites are tapestry needles with a bent tip. That tip makes it super easy to get under your warp threads.

Cotton or linen yarn
You will need a strong, non-stretchy yarn to set up the warp on your loom. Cotton or linen threads are perfect.
You can choose any color. Depending on how tight your weave is, these yarns will be (mostly) covered by your work. You will still see the color on the loops on top when you’re finished and hang your wall hanging. So pick a color complementary to your project’s color scheme.
Wools and other Yarns
Which yarns you use for the design of your weave, the weft, is all up to you. Go through your leftover scraps of yarn. Choose your favorite colors, wool or synthetic, combine different textures and weights. Have fun with it.
Warp Spacer
A warp spacer is a fancy word for a piece of cardboard. You will need a warp spacer when you want your finished weave to be shorter than your loom. You weave the cardboard on the bottom of your warp as a temporary placeholder.
It will be the foundation on which you push down your weave. A warp spacer also makes it easier to tie off when you finish weaving, leaving you with longer warp yarns to secure your weave.
Dowel Rod
When you are ready to remove your weaving from the loom, you’ll need a wood dowel rod or some other type of stick to weave through the loops along the top. Make sure it is about 3-4 inch wider than your weave.
Scissors
And finally, sharp scissors to cut all your lovely yarns.
I love my pretty stork scissors, but you can obviously use any scissors you have.
If you are just starting out, you can purchase a weaving loom kit. This will give you all the essential weaving tools so you can start your first weave.

How to Set up your Weaving Loom
As soon as you have gathered all your tools and materials, it’s time to set up the warp on your weaving loom so you can actually start to weave.
Take your time warping your loom because it is an important step as it will be the base where you will weave upon. Try to have an even tension throughout the warp.
Tip! Make it easier for yourself by placing your loom sideways while you set up the warp. And make sure that both top and bottom beams are tight in place.

How to Set up your Weaving Loom
Every weaving project starts with setting up the warp of your weaving loom. Warping the loom. Here are all the steps to get your started.
Materials
- Weaving loom
- Cotton yarn
- Cardboard
- Heddle bar / Shed stick (optional)
Tools
- Scissors
Instructions
- You can start your warp at any corner. I like to start at the left corner of the bottom bar. Make a loop with your cotton yarn and wind it around the first tooth.


- Guide the thread up and through the heddle bar and pass it around the first (left) tooth on the top bar. If you are not using a heddle bar, just go straight to the top.

- Go back to the bottom bar through the next notch on your heddle bar.
Wrap your thread around the first tooth on the bottom and guide your thread up again. Through the next notch on the heddle bar and around the second tooth on top.
Each warp thread goes twice through each notch on top and bottom bars, but only once through each notch on the heddle bar.
- Repeat up and down until your warp is the width you want it. Finish by tying a knot around the bottom beam.

- Create the shed with a shed stick if you don’t have a heddle bar. Weave your shed stick over and under the warp threads all the way across. Flip your shed stick to separate the warp threads and create the opening to pull your weft yarn through.
- Insert your warp spacer. Weave it over and under your warp threads and push the warp spacer all the way to the bottom.

Notes
The time required to warp your loom is an estimate. Actual time depends on experience and the size of your weaving loom.
Check your Warp Tension
When your warp is finished, check its tension. Lightly pull the yarn to even out any uneven sections.
If you have a loom with one or two adjustable bars, you can increase the overall tension by loosening the wing nuts and turning the warp bar slightly. Tighten the wing nuts to secure.
How to Load your Shuttles

Take the end of your yarn and hold it with your thumb on the shuttle. Try not to overlap the yarn too much. You don’t want too much bulk when you have to pass it through your warp threads. You can loop the sides as well, going in a figure-eight motion around the sides.
Keep going! In the next part of this weaving series, the actual weaving starts. Bring your yarn and I’ll see you there!
I have watched and read a lot of absolutely terrible how-to guides for beginning weavers. I am so happy that I found this wonderful tutorial. Thank you for the time and effort you obviously put into it. I have a dressed loom and am ready to start!!
Thank you so much for your kind words! It means a lot to hear that my tutorial was helpful. So exciting you are ready to start weaving on your dressed loom. If you have any questions along the way or want to share your progress, feel free to reach out. Happy weaving!
I have just ordered a Huge Professional Weaving Loom Kit and what do I find before I even receive it, but your wonderful teaching. Once I receive it, I will feel so comfortable because I know exactly where to get the help. Thank You!
I’ve been doing a bit of research around weaving lately. It has been so nice to find a site like this, so easy to understand. I had a tiny little loom as a child in the 60s (unfortunately lost many moons ago). Your descriptions have brought my ‘weaving’ memories flooding back. All i’ve got to do now is decide which type of loom I want. Thankyou so much.
heard about this on mbube radio, decided to give it a try.